DIY Holly Wreath – Recycled Coat hanger

Standard

holly wreathThings are getting very festive here.  Yesterday, after my 8K run (smug), I was up at the church to help decorate for Christmas. Everyone brings greenery from their gardens and dumps it in a huge pile in the church foyer.  I help every year, it’s a great opportunity to share and catch up with the people.  We had home made rock cakes, tea and a plenty of time to chat.  I made a giant wreath for the pulpit (didn’t take my camera or even phone – sorry).

There was lots of variegated holly left over so I brought some home to re-style my coat hanger autumn wreath.  I pulled all the leaves off my coat hanger and proceeded to wire my holly on.  It was a right fiddle and my hands got stabbed to bits!  It’s really a bit too early for decorating (in my book) but the opportunity arose.  That’s another job off my list then. Tonight the Christmas lights go on in the village so it’s all systems go.

Home Made Gifts – Lemon Curd

Standard

how to make lemon curdMechanic Man is going to do well this Christmas, chocolate dipped candied orange peel AND lemon curd.  He likes citrussy things almost as much as he likes honey (he’s getting honey too).  The Wee Man and I have already made our trip to our local honey farm near Berwick to buy him some for Christmas.  We had to taste all the honeys several times each before we could choose the best one.

I just made the pine cone elf for the Wee Man – he collects pine cones and I collected that special one for him in Australia.

I have been making lemon curd since I was a kid.  I first made it at Middle School and haven’t been able to eat “shop” lemon curd since.  I always use the recipe from my Mum’s 1966 Good Housekeeping recipe book.

home made lemon curd jars

Lemon curd is ridiculously easy to make.  There’s only four ingredients.  This quantity makes three good-sized jars (we’re keeping all three)!  Our jars are in the fridge but are not be be consumed until Christmas (unless I make a lemon curd Swiss roll).  If you are willing/able to share yours – a jar would make a much appreciated gift for the lemon lover in your life.  Luckily I get to give mine away and still keep them!

Ingredients:

  • 4 free range eggs (beaten)
  • 4 un-waxed lemons (zest and juice).
  • 1 lb (450g) granulated sugar
  • 4 oz (110g) butter

Method:

  1. Place all the ingredients in a double boiler (or a decent-sized bowl over a pan of simmering water).  The bowl should not touch the bottom of the pan but should rest in the water.
  2. Stir the ingredients until thickened (it takes a while, but you needn’t stir the whole time).
  3. Sieve into sterilized jam jars, keep in the fridge when cool and consume within one month.

You can use lemon curd to make jam tarts (heaven) or as a filling for lemon cakes.  It’s wonderful on toast or on crepes, crumpets or pancakes.   Mechanic Man likes his on French toast (yuk) it’s a weird North American thing – we Brits of course treat our eggs as savoury and put ketchup on our French toast!

DIY Candied Orange Peel

Standard

chocolate dipped candied peel

My husband is from California – where Oranges grow on trees! I remember his 80 year-old grandmother giving me some of her home-made candied peel one Thanksgiving.  It was just wonderful and I was so impressed.   Last year I bought Mechanic Man some locally made, dark chocolate dipped, candied peel for Christmas – he adored it.

This year, I tried a sample from the same vendor and although the Belgian chocolate was delicious, the orange just wasn’t zingy enough.  Remembering Grandma Grace, I thought I’d have a go at the peels myself.  I found this great recipe with lovely photos on a  blog called bright eyed baker.  I used her recipe but scaled it up as I had four oranges.

This quantity makes a dinner plate of peel and filled two jam jars before I dipped some of them in chocolate. You could probably fill four jam jars if they were all choc dipped.  I elected to only dip half of each peel in chocolate as I thought they’d look prettier.

  • 4 Navel Oranges
  • 1 cup water
  • 2 cups granulated sugar
  1. Wash the oranges and cut the top and bottom off.
  2. Score into quarters (along lines of longitude) through the skin and pith (orange and white bit).
  3. Peel off the skin/pith “quarters”.  I put the “waste” orange on a plate and left it on the kitchen table – it all disappeared within minutes.
  4. Cut these quarters into thin strips lengthwise about 1/4 inch or 5 mm wide.
  5. Place strips in a pan of water and bring to the boil, boil for a few minutes.
  6. Drain and repeat step 5, TWO times more to reduce bitterness of the pith.
  7. Add the measured water and sugar to a pan and stir over a low heat to dissolve the sugar.
  8. Bring to the boil and simmer for 10 minutes.
  9. Add the peel and simmer gently for another 45 minutes DO NOT STIR.  Stirring will cause the sugar to crystallize.  You can occasionally rotate the peels gently if you feel they are not all getting equally “candied.” DO NOT let the pan boil dry.
  10. When the peels are translucent, drain the excess liquid (there won’t be much) and keep this it for another culinary use.
  11. Place the peels on drying racks and dry in the oven for about an hour at 90C.
  12. Put the peels in a ziploc bag with a little extra sugar and shake the bag to coat them (they look prettier this way and are less sticky to handle/wrap).
  13. Store them in an airtight container.

candied orange peel

You can dip some peels in melted chocolate to be extra decadent or eat them as they are (very zingy). The photo above is the jar I made for Hubby. Melt the chocolate in a double boiler and lay the chocolatey peels to harden on a silicon baking mat.

I plan to use some in my holiday baking, in place of “shop” peel.  I also made little cones out of cellophane and gave some to my baking friends as little pre-Christmas gifts. (Sorry Lizzie I made yours before I raided my “bling” box and found the holly and mini bells)!

candied peel pretty packaging

DIY Candy Advent Tree

Standard

candy tree adventMy kids love advent – Christmas is coming; and, they usually get a chocolate advent calender.   We gave up on those cheap cardboard ones years ago as the chocolate is not nice.  Some years ago, I bought a re-usable calender with little felt bags that you fill with your own sweets.  I have four kids so they normally take it in turns getting a few sweets in thier allocated bag every four days – we have a rota!

Last year I made my own.  I bought the kids three new pairs of socks each and filled each sock with a full-size chocolate bar.  We pegged the socks up on a string and wrote numbers on the wooden pegs.  This went down well as you can imagine (they are always wanting socks without holes)!  If your numbers don’t work out as well as mine, you can add days for parents/guests.

advent tree candy

This year I didn’t have an advent plan but went shopping yesterday looking for sweets to inspire me.  The cheapest way to buy a decent quantity of decent quality wrapped sweets remains a tub of Quality Street – £4 in Tesco.  Well, the other tubs of chocs were the same price but nothing says Christmas quite like Quality Street.  There were 81 sweets in the tub – nearly one sweety/child/day (I didn’t count them in the shop)! I bought a packet of mini lollies just in case (£1); so, with those I had enough sweets to give them one sweet each each day.  Won’t they be happy.

paper doily cone

DIY paper doily cone

I wanted to make little paper cones to wrap the sweets and started playing with a packet of doilies that a friend gave me as a gift on Thursday.  I found that, if you cut a doily in quarters you can make a little cone just large enough for one sweetie.  I wrote a number on each quarter, taped them closed and tied the top with a scrap of waste yearn.  After making 24 of them I started to think about where I could hang them – flash of Inspiration – the dead bay tree I normally hang my necklaces on!

My Mum’s bay tree died about five years ago after moving from the Sunny South of England to Scotland.  After it sat forlornly in the garden for several years, we sawed the roots off and screwed the trunk to a wooden base.  I used it to hang decorations on at craft fairs.  In between craft fairs, it sits on my dressing table as a jewellery tree.  We are re-constructing our room just now so the tree was once again in the back garden.

paper cone made from doily

I hung the paper cones on the tree but it was a little boring with just the white cones; so, I added the rest of the sweets as they were.  I made little “S” hooks with some very pliable craft wire I had and for the lollies and sweets with no “tails” to poke the hook through, I stuck a yarn loop on with sticky tape.  I used little squares of masking tape and a pen to add the numbers.   I could have made it all a lot more sophisticated with curling ribbon and printed numbers but hey, it’s good enough to eat.

advent chocolate orange cream

The kids were really excited when they saw it, they are very excited for tomorrow when they will get a sweet every day (unheard of treat).  They even admitted I was a clever Mum – not acknowledged often enough me thinks.   The wee man has spent much of today gazing up at it and thinks it’s very pretty indeed.  He also thinks he has the advantage in that he gets up first and will get the first choice of sweets; but, he is already sad that it will get less pretty with each day.  Maybe we can make something else to hang up later – gingerbread and/or popcorn garlands?

Let the Good Times Roll – Chocolate Custard Swiss Roll

Standard

chocolate swiss roll with custard

I’ve started thinking about our Christmas food – I admit it.  I like to be organised and want to feel positive and excited about Christmas.  Every year, we always have pretty much exactly the same food – very traditional and delicious.  My Mum was a great one for tradition.  This year, however, I can’t face making/eating a Christmas Cake and a Christmas Pudding that I know my Mum and my My Brother (who is abroad) won’t be able to share.  They were/are the biggest fans of the “dried fruits held together with a teaspoon of flour” delicacies.  So I’ve been thinking about “still traditional” alternatives – that my kids might even like.

I have decided to make Stollen instead of a Christmas Cake as I just adore it and the kids like it too.  The desert for the main event is proving more problematic.

I suggested a lemon cheesecake or something similar but the kids said it wasn’t Christmasssy enough – even though they hate Christmas pudding. They reckoned something chocolatey would be good (but I’m not a huge chocolate fan).  A friend suggested a trifle.  My Mum made the best trifle and I did make one last year for my brother – so that was the best idea so far.   On the Great British Bake Off this year they made a kind off upside down trifle called a Charlotte Royale.  When we watched the episode, my kids thought it looked good and that we should make one – so I thought I had my solution – some sort of upside down trifle.

Bake off charlotte royal

I googled “upside down trifle” and found this –  a chocolate upside down trifle with black cherries.

chocolate upside down trifle

Number one son – the Apprentice – loves black cherries and all the kids love chocolate Swiss roll.  I tried making a Swiss roll when I was a kid and I over-baked it and it turned out like a giant cookie.   Today is Ballet Girl’s 15th Birthday and she had requested I make her profiteroles for her “cake.”   This morning I dutifully made her profiteroles using this recipe and then thought I’d make a practice Swiss roll while I was in the baking mood – the more Birthday cakes the merrier!  I had chocolate sauce left over from the profiteroles too.

chocolate swiss roll with custard

As you can see my practice came out well.  My Swiss roll tin was a bit small so my cake was a bit thick – but hey it’s art not science.   I didn’t have any cream left after I filled the profiteroles so I improvised with half a carton of left over custard.  I painted the ganache sauce on with my silicon pastry brush.  The decorations are left-over butterscotch chips from the Father’s Day Oreo Tart I made back in June.  So, Ballet Girl came home from school to two cakes – a pile of profiteroles and a giant Swiss roll!  Mechanic man just came in from the cold and is pretty pleased too – time to order the Chinese take-away Ballet Girl requested for her Birthday tea.  Not sure how we’ll manage to do the deserts justice but we’ll try.

A Grand Day Out – Abbotsford

Standard

Abbotsford house autumn

Today was a special treat for me.  I was booked in on a photographer’s workshop at Abbotsford.  Abbotsford was the home of novelist Sir Walter Scott.  It sits on the bank of the mighty River Tweed near Galashiels here in the Scottish Borders.  It has recently undergone extensive renovations and was just re-opened by the Queen.

Abbotsford house autumn

Abbotsford is a magnificent country house built by Scott in the early 1800s on the site of a traditional farm.  The interior is full of Scott’s eclectic collections of books, guns, armour, art and quirky interiors salvaged/collected from all kinds of famous and unlikely people and places.  It is full of treasure and a great place to visit.  The gardens are lovely too and the setting is absolutely stunning.

river tweed at abbotsford

The objective of the day was to use a SLR digital camera (I have a Nikon D3000) and tripod (Christmas prezzie from Mechanic Man a couple of years ago) and practice taking shots in manual mode (no Auto!).  We were to choose appropriate exposure times and depths of field.  All very technical I know – I usually use the auto settings but do occasionally fiddle about in manual so today was an opportunity to spend time practising with manual.

vriver tweed at abbotsford

Basically I took hundreds of photos using different settings – longer and shorter exposures – for example and then chose the best ones.  Normally, one doesn’t have the luxury to spend all day trying to get a good shot but that was the point of today.  I didn’t really know what I was doing but I just kept at it, experimenting.   Tea breaks and lunch were laid on as part of the package!

garden gate at abbotsford

river tweed in autumn abbotsford

Today, the weather was good so I concentrated on taking photos outside – it was cold and windy and a bit gloomy this morning but not raining!  The sun conveniently came out in the afternoon just before it got dark!  Despite the cold air, I was cosy in my new hat.

I was determined to get at least one good photo of the house and one good snap of the trees and/or River.  I took nearly 300 photos and these are some of the best (in my opinion).  I really should do this type of thing more often.

autumn trees at abbotsford

secret garden abbotsford

garden statue abbotsford

abbotsford house

autumn trees river tweed

This last photo is the new visitors centre at dusk, taken as we were leaving.

abbotsford visitors centre at dusk

Running Stitch

Standard

scottish ploughed fieldI realised I haven’t shared my latest hobby – running! Hence the title of this post – I’m running and getting stitch as well as my normal sewing “running stitch”.  Sorry, I couldn’t help myself.  Now, I’m currently 46 and haven’t run since school.  At school I could run because I weighed nothing and had the determination to succeed and try my best  (i.e. make it round the track in PE lessons while others just walked).  Since then, like most folk, I’ve found it unnecessary to run (except for the occasional bus and in Mum’s races at school before the health and safety brigade spoiled everything).

speedy's wood, earlston

I love hiking but it takes a whole day to get a good workout.  A couple of (running) friends suggested I try running so I can my exercise over and done with quickly (more time to knit/crochet/sew/bake/read etc.); and, since I’ve lost 20 lbs and have my high school body back I reckoned I could try it.  Well, I’m hooked now.  It hurts at times but it’s strangely satisfying – luckily I’m as determined as I ever was and I can’t stop now or I’ll undo all my hard work getting to this point.  Also because I’m unemployed right now, my running gives me a focus and gives me a great sense of achievement – and great legs.

autumn3

I followed a brilliant podcast called Couch to 5K.  It’s a 9 week training program you listen to on your ipod and it gets you off the couch and running 5K (approx 3 miles) in 9 weeks.  It actually gets you running for 30 minutes which they reckon is approx 5k in distance.  It’s available free from the NHS (National Health Service) website.  You run 3 times a week and follow the instructions/listen to the music and encouragement from Louise your personal trainer and you can’t go wrong.  The first week is just running for 60 seconds at a time and walking in between.

river leader

It builds up slowly and before you know it, you’re a runner.  I am a “Couch to 5K Graduate” now as I started nearly four months ago – but, interestingly, I found the very first day was actually the hardest, so if you try it, don’t give up.  Since I finished the podcast, I have kept running for 30 minutes, three times a week (occasionally up to 40 minutes) while listening to my own music.  I feel like an athlete.

mill meadow earlston

I feel great and the weight is staying off even though I am now consuming slice after slice of my sourdough bread.  To keep me on track, I have signed up, with my running friend, to do a 5K run in Edinburgh in January (around Arthur’s Seat) the extinct volcano in the middle of Holyrood Park.  I also have a friend in the village who has just started the couch to 5K program because she was impressed by how fab I’m looking.  I can’t recommend the podcast highly enough.

earlston

My main problem is not getting bored running the same paths as we live in a small village surrounded by hills; so, even though we have a lot of paths and it’s stunningly beautiful, it’s hard to run for 30 minutes without running out of flattish paths pretty quickly.  I took these photos on my iphone this week while I was out running to show you how Autumn is progressing here in Scotland.  We have had a few morning frosts so I’ve had to watch my step, but overall it’s been great weather – not much rain and not too cold (for here anyway)!  Today is stunning and the sky is blue (top photo).

Giant Jaffa Cake and Leaf Wreath

Standard

DIY fall leaf wreath idea

The “English” get a bit huffy at Halloween, they start complaining about the “Americanisation” of October 31st and all the paraphernalia and hype in the shops.  Guy Fawkes Night (aka Bonfire Night) is their seasonal celebration (November 5th).

Well, here in Scotland, Halloween has always been celebrated with the tradition of “guising” – not “trick or treating” you understand, just dressing up and going round the houses in dis”guise” – performing a wee song, skit, poem or nowadays often just a joke.  Since our household is 50% Scottish and 50% American – we indulge in Halloween.  Also, the Scots are secretly a wee bit annoyed Guy Fawkes didn’t succeed in blowing up the English Parliament – so no “Bonfire Night” for us North of the Border.

The best thing about the Americanization of All Hallow’s Eve, however, is the introduction of the pumpkin.  It wasn’t any fun as a small Scottish child trying to hollow out a “neep” (swede) for your lantern.  In fact it was impossible. My effort below is pretty basic compared to Ballet Girl’s but I was busy making my wreath!

spider carved pumpkin

So pumpkins are fun and my kids, who are denied “sweets” pretty much all year except Easter and Christmas, like Halloween very much.  This year, I am celebrating the fourth and final coat of fresh paint on my front door with a seasonal leaf wreath.  I threaded hundreds of sycamore leaves on to a wire coat-hanger – time consuming but cheap (no cost) and therapeutic.  It used a lot of leaves but I was able to nip up to the Church Yard for more leaves every time I ran out.  To “treat” my kids this year I have made them a giant Jaffa cake.

autumn decor and cakes

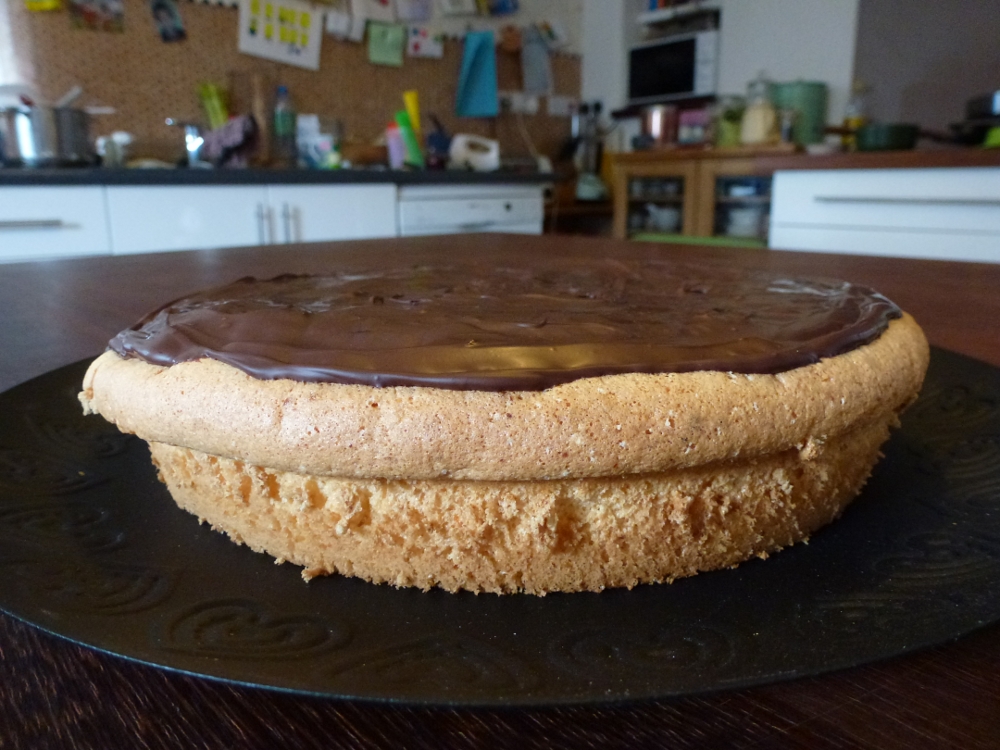
I was going to put red food colouring in the orange jelly bit to make it “blood orange” for the occasion but in the end chose not to (didn’t want to sully a classic).  I found the recipe on a blog I follow called Tangerine Drawings and you can find it here.  I just love the fact that she uses drawings rather than photographs.  My sponge turned out beautifully, very light.  It’s made from only flour, cornflour, sugar and eggs.  The orange jelly is made from gelatine, fresh squeezed orange and marmalade.  The chocolate top is pure dark chocolate.  So, pretty much like a regular Jaffa Cake only bigger.

home made jaffa cake slice

Basically you bake the sponge, make the jelly in a slightly smaller cake tin lined with cling film, then when it’s set, place the jelly on top of the sponge and smooth the chocolate (melted over a pan of hot water) over the top.  I apologise for my plastic table cloth – mine is a working kitchen not a photo studio.  I cook, I mend, I make; and, sometimes I clean (when absolutely necessary) ‘cos it’s no fun at all and cuts into my “playtime.”

how to make a giant jaffa cake

My giant Jaffa Cake turned out a bit tangy, I’m not sure the kids will actually like it, I maybe shouldn’t have used home made Seville orange marmalade or should have added more sugar.  Still, if it’s too sharp for the kids, we sophisticated grown ups can eat it all.  Jaffa Cakes are pretty low fat you know.  Here’s another shot of my kitchen, I took the table cloth off for this photo but you can see all the normal kitchen mess in the background.

giant jaffa cake recipe

Anyway, have a great All Hallow’s Eve, however you celebrate it, keep warm, crochet yourself a new hat, make a cake, snuggle someone you love.

Plays Well With Knives

Standard

mouth

Just a quickie – proud Mama has to share 14-year old Ballet Girl’s pumpkin.  She may be a ballet girl but she’s pretty handy with a Swiss Army knife; but then she should be, she’s been “playing” with one since she was little.

This is the second pen knife success story from Ballet Girl.  The first one was when she was at Scout Camp and won extra points for her patrol by hanging up their swim suits to dry.  I asked “did you take pegs?” (I never go camping without pegs).  No, she said, “we whittled some out of sticks”.  Proud pen knife moment number one.  Hopefully she never gets her arm caught in some rocks.

His ‘n’ Hers Crochet Earflap Beanie Hats – Free Pattern

Standard

Image I crocheted these two hats from pure wool yarn unravelled from a sweater I bought in a charity shop.  Unravelling a sweater is a labour of love that’s for sure, but you are rewarded with a lot of yarn for the money.  The yarn has to be unpicked, skeined, washed, dried and re-skeined or wound into balls before use!  It took a lot longer to “process” the sweater yarn than it did to crochet the two hats!

I wanted to make Mechanic Man a new work hat for Autum/Winter and thought the colours would look good with his colouring (reddy/blonde).  His garage is freezing even in Summer so he wears a hat all day for most of the year.  He was at work when I took these photos so my daughter is modelling.

Image

I made him a lovely hat last year but unfortunatly it found it’s way into the washing machine with his uniforms and shrunk spectacularly.  Mechanic Man was sad about his old hat but chuffed that he had managed to make a felt bowl all by himself.  I had a lot of yarn left from my sweater, so I thought I’d make a coordinating hat for me – Hence His ‘n’ Hers!

I made HIS in random stripes – most one colour wide – so that it won’t show the dirt/grease/oil too badly.  I made mine with stripes ‘cos I’m a sucker for stripes. The top of my hat has five rounds of the same colour and then each stripe has four rounds.

I very carefully wrote down the pattern for these hats as I was making them and now I can’t find the piece of paper.  Still, here’s the gist.  It’s basically a beanie hat with a few extra rows added for a neck warmer (on 2/3 of the total stitches and then an ear-flap triangle added on each end of the neck warmer).  My instructions do assume you know how to crochet and have had a go at a hat before.

I have a beginner hat pattern with more detailed instructions here.

Image

Notes:  This hat is worked in rounds, to join each round you can either slip stitch into the first st of the previous round and chain 2, or single crochet into the first stitch of the previous round and chain one.  This chain counts as your first stitch of the next round.  It must also be noted that my tension is tight, so if you crochet loose, you may want to use a slightly smaller hook.

  • 6mm crochet hook and approx. 70g Aran weight yarn for each hat.
  • Use a magic loop or as small a chain loop as you can to start.
  • Round 1: Make 10 single crochet sts (double crochet UK).
  • Round 2: Make 2 SCs in every stitch (20 sts).
  • Round 3: Work one round (20 sts).
  • Round 4: Make 2 SCs in the first and every other sts (30 sts)
  • Round 5: Make 2 SCs in the first and every third st (40 sts)
  • Round 6: Work one round.
  • Round 7: Make 2 SCs in the first and every fourth st (50 sts)
  • Round 8: Make 2 SCs in the first and evry fifth sts (60 sts)
  • HER hat: Continue to work on these 60 sts until the hat is the desired length (without neck flap)  For my hat I worked approx 33 rounds.
  • HIS hat : Work another increase round, increasing 5 sts evenly around the hat (65 sts) and continue without further increase. You can add a couple of extra rounds too if you want a bigger hat but I worked 33 rounds HIS hat too (I have a big head).
  • Neck Flap: To make the back a little longer than the front (built-in neck warmer) work back and forth in rows for FOUR rows on 40 sts HERS (45 sts HIS).
  • Ear Flaps: Work the ear-flaps backwards and forwards on each end of the neck piece.  I worked the ear-flaps on 9 sts for HERS (11 sts HIS) and decreased one st at each end of every other row until there were no sts remaining.
  • To make a edge, work TWO rounds of SC around the whole hat – decreasing one stitch in internal corners and increasing one stitch at external corners.
  • I added tassels to HER hat but not to HIS as I don’t want HIM getting mangled in a machine at work!
  • I hand stitched lining into the inside of HIS hat with some jersey fabric from an old Marks and Spencer’s T-shirt so it will be super comfy and warm.  You can see in the photo below that the back is a few rows longer to keep HIS neck warm (the lining is level with the edge at the front).

If you find this pattern helpful or utterly confusing please let me know!

ImageImage

Image